After we created the Article entity and showed all the articles, we can now go and create the methods/actions that will take care of handling the other user’s requests.
Let’s imagine a user will click on an article (since we don’t have a frontend yet). In this case, our app should display the contents of that article. Let’s add a method inside HomeController again, that will display one particular article:
📁 Controllers/Http/HomeController.ts
import { Controller, Get } from '@Typetron/Router'
import { Article } from 'App/Entities/Article'

@Controller()
export class HomeController {

    @Get()
    index() {
        return Article.get()
    }

    @Get(':id')
    read(id: number) {
        return Article.find(id)
    }

    @Post()
    add(form: ArticleForm) {
        return form
    }
}
By giving the @Get decorator the parameter :id, Typetron will register a method that will handle all the requests to /1,/2,/3 etc., where those numbers represent our article identifier.
Now, if you go to localhost:8000/1 you will see all the contents of a the article with id 1. If you change that 1 into 2, you will see the contents of article 2 and so on.
We can also use Route-Entity binding, which is just a fancy name, where Typetron will find the Entity for you based on the name of the route parameter and the name of the entity:
📁 Controllers/Http/HomeController.ts
import { Controller, Get, Post } from '@Typetron/Router'
import { Article } from 'App/Entities/Article'

@Controller()
export class HomeController {

    @Get()
    index() {
        return Article.get()
    }

    @Post()
    add(form: ArticleForm) {
        return form
    }

    @Get(':Article')
    read(article: Article) {
        return article
    }
}
Passing article as a route parameter and Article as a method argument, Typetron will do Article.find() for you.
Our app can display all the articles or one particular article. Let’s make it more interesting and add the ability to create an article. To do that, replace the add method inside HomeController with this piece of code:
📁 Controllers/Http/HomeController.ts
import { Controller, Get, Post } from '@Typetron/Router'
import { Article } from 'App/Entities/Article'

@Controller()
export class HomeController {

    @Get()
    index() {
        return Article.get()
    }

    @Get(':Article')
    read(article: Article) {
        return article
    }

    @Post()
    async add() {
        const article = new Article()
        article.title = 'My awesome article'
        article.content = 'My awesome content'
        await article.save()
        return article
    }
}
We also have a shorter alternative for creating a new entity:
📁 Controllers/Http/HomeController.ts
import { Controller, Post } from '@Typetron/Router'
import { Article } from 'App/Entities/Article'

@Controller()
export class HomeController {

    @Get()
    index() {
        return Article.get()
    }

    @Get(':Article')
    read(article: Article) {
        return article
    }

    @Post()
    add() {
        return Article.create({
            title: 'My awesome article',
            content: 'My awesome content'
        })
    }
}
The @Post() decorator will register a route that will handle all the HTTP POST requests. Since we don’t have a frontend with a form that we can fill, we can’t make such requests from our browser, but we can use Postman for that. There, we can change the HTTP Method to POST and write the url we want to post to, which is localhost:8000. If we run this request and check our database we will see we will have a new article with the title My awesome article. Actually, every time we run that request we will create such an article.
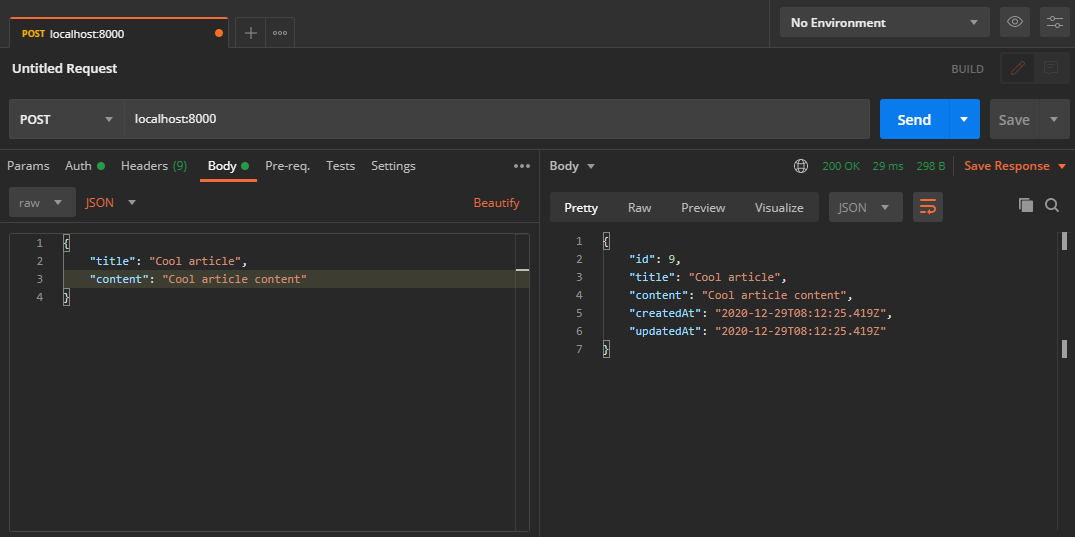
Let’s make it even more interesting and add the user the ability to add his own title and content. To do so, change the body of the request into this JSON:
🌐 [POST] /
{
    "title": "Cool article",
    "content": "Cool article content"
}
We can now use this that in our controller like so:
📁 Controllers/Http/HomeController.ts
import { Controller, Get, Post } from '@Typetron/Router'

@Controller()
export class HomeController {

    @Get()
    index() {
        return Article.get()
    }

    @Get(':Article')
    read(article: Article) {
        return article
    }

    @Post()
    add(request: Request) {
        const data = request.body as {title: string, content: string}
        return Article.create({
            title: data.title,
            content: data.content
        })
    }
}
We created a form earlier called ArticleForm that can also validate user data, so we can use that instead of the request object:
📁 Controllers/Http/HomeController.ts
import { Controller, Get, Post } from '@Typetron/Router'
import { ArticleForm } from 'App/Forms/ArticleForm'

@Controller()
export class HomeController {

    @Get()
    index() {
        return Article.get()
    }

    @Get(':Article')
    read(article: Article) {
        return article
    }

    @Post()
    add(form: ArticleForm) {
        return Article.create(form)
    }
}
Typetron will validate the user input for us behind the scenes, and it will throw an error in case of invalid data. If an error is thrown, the method in the controller will never be called, so we know for sure that our data is valid once it goes in the controller.
Now, you can use Postman to create a new article:
We can easily add, update and delete actions to our controller:
📁 Controllers/Http/HomeController.ts
import { Controller, Delete, Get, Put, Post } from '@Typetron/Router'
import { ArticleForm } from 'App/Forms/ArticleForm'
import { Article } from 'App/Entities/Article'

@Controller()
export class HomeController {

    @Get()
    index() {
        return Article.get()
    }

    @Get(':Article')
    read(article: Article) {
        return article
    }

    @Post()
    add(form: ArticleForm) {
        return Article.create(form)
    }

    @Put(':Article')
    update(article: Article, form: ArticleForm) {
        return article.save(form)
    }

    @Delete(':Article')
    async delete(article: Article) {
        await article.delete()
    }
}